How to Resize YouTube Video Player
Many of us use YouTube everyday for our entertainment. Not just watching, we usually share our videos to our friends. In this tutorial I'm posted about YouTube Center Script, Center script is a browser extension that allows you to resize your Youtube video player, You can drag with your mouse and change the whole size of your video player, It will automatically adjust the pixel ratio.

Adding YouTube Center Script
1. To install it, You can grab it from here
2. If you are using Google Chrome, it will install automatically but In the latest version of Google Chrome you can't install it directly because recently Google changed the way to add extensions that are not in the Chrome web store to your browser. So, to install it follow these steps,
- Download the extension file from the website and save it to your PC
- Now on chrome go to Tools > Extensions
- Locate the extension file on your computer and drag the file onto the Extensions page
- When dialog box is pop-up click on Install
3. If you are using Firefox than you need to have Greasemonkey Installed and than click on Install on the script page.
Advantages of this script
1. Changing resolution by draging with your mouse
2. Lets you repeat videos.
3. Download them instantly in many formats.
4. Downloading video as MP3
Also read : Unfriend finder script for Facebook
Tag :
Social Networking,
YouTube
New Facebook Chat Codes: colored chatting
Now on Facebook you can type anything in colored characters. Facebook recently made changes to it's chatting feature, Facebook provides some codes to type anything in color, Just copy any characters code You like to write and paste them in your chat box and click enter and colored character will be displayed.


New Facebook Chat Codes
Codes of A-Z
Below are codes of A-Z which you can use in Facebook chat. You can create your on words with this codes.
[[107015582669715]] = A
[[116067591741123]] = B
[[115602405121532]] = C
[[112542438763744]] = D
[[115430438474268]] = E
[[109225112442557]] = F
[[111532845537326]] = G
[[111356865552629]] = H
[[109294689102123]] = I
[[126362660720793]] = J
[[116651741681944]] = K
[[115807951764667]] = L
[[106596672714242]] = M
[[108634132504932]] = N
[[116564658357124]] = O
[[111669128857397]] = P
[[107061805996548]] = Q
[[106699962703083]] = R
[[115927268419031]] = S
[[112669162092780]] = T
[[108983579135532]] = U
[[107023745999320]] = V
[[106678406038354]] = W
[[116740548336581]] = X
[[112416755444217]] = Y
[[165724910215]] = Z
[[116067591741123]] = B
[[115602405121532]] = C
[[112542438763744]] = D
[[115430438474268]] = E
[[109225112442557]] = F
[[111532845537326]] = G
[[111356865552629]] = H
[[109294689102123]] = I
[[126362660720793]] = J
[[116651741681944]] = K
[[115807951764667]] = L
[[106596672714242]] = M
[[108634132504932]] = N
[[116564658357124]] = O
[[111669128857397]] = P
[[107061805996548]] = Q
[[106699962703083]] = R
[[115927268419031]] = S
[[112669162092780]] = T
[[108983579135532]] = U
[[107023745999320]] = V
[[106678406038354]] = W
[[116740548336581]] = X
[[112416755444217]] = Y
[[165724910215]] = Z
How to Use Above Codes
- Wanna create hi . So pick up codes of H and I .
- Which is [[111356865552629]] [[109294689102123]]
- Make sure there is space in between any two codes or else it will not work.
If you can like this post then please like our Facebook page.
How to recover/regain Hacked Facebook Account
As of today Facebook hacking and account phishing is common problem because Facebook has biggest social network worldwide and hackers usually hack any account to get some sensitive data for wrong purpose. If you are one of whose account has been hacked or did you forget your password then Facebook provides a simple way to recover/regain your account.


How to Recover/Regain Hacked Facebook Account
- At first go to account recovery page
- Here you will see message like above just click on My Account Is Compromised, and they will take you to another page asking you to identify
- Here enter your email or phone number or username. You can also enter your name and your friends name.
- Now just check one’s that’s your account and press this Is My Account/Continue.

- Now Facebook will simply ask you to enter the Current or Old Password, if your account was compromised than surely your new password will be changed so enter the current if that does not work than try to enter the old one which you changed earlier.
- If your old password is accepted than you will have option to get your reset code on your mobile or email
- Now you can enter your new password.
- Also report for any phishing attack at phish@fb.com
How to Pre Schedule Status Update on Facebook
Officialy Facebook now give the option to pre schedule updates for page admins. Now page administrator's can schedule posts in advance up to next 6 months, adding feature that were previously only available in third party apps. With help of below multi-step process you can schedule your updates.


 Here you can either change the time, publish your post immediately, or cancel it altogether. Enjoy :)
How to Pre-Schedule Your Status Update
1. At first log-in to your Facebook fan page and click inside your page's status update area,
2. Now click on small grey clock icon will appear in the lower left-hand corner.
3. Now click "Add Year" link from within the dropdown menu, select the year in which you want to post the update,
4. Then click "Add Month" and select the month you want to update to go live,
5. Now click "Add Day" and enter the date,
6. Now click on "Add Hour" and then "Add minute" of the day to post
7. Finally click on "schedule"
7. Finally click on "schedule"
Once Facebook saves your update, you’ll see this popup box,
How to see or reschedule your scheduled post
To see or reschedule your scheduled posts, scroll up to the top of your page and click "Edit Page > Use Activity Log"
Now your scheduled posts will display.
Here you can either change the time, publish your post immediately, or cancel it altogether. Enjoy :)
Must read : How to See Who's Unfriended You on Facebook
Tag :
Facebook,
Social Networking
How to See Who's Unfriended You on Facebook

Adding Unfriend Finder Extension
1. The extension can be available here with full installation guide. If you are using Google Chrome, it will install automatically but In the latest version of Google Chrome you can't install it directly because recently Google changed the way to add extensions that are not in the Chrome web store to your browser. So, to install it follow these steps,
- Download the extension file from the website and save it to your PC
- Now on chrome go to Tools > Extensions
- Locate the extension file on your computer and drag the file onto the Extensions page
- When dialog box is pop-up click on Install
If you are using Mozilla Firefox, You will have to first install the Greasemonkey- add on, after adding Greasemonkey you will be able to install Unfriend Finder script.
2. After installation is finished you need to restart your browser
3. Now go to Facebook and log-in to your account
4. On the top right menu you will see one more tab which is "Unfriends"
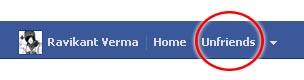
And one more option "Unfriends" in your favorites list.

Advantages of this plug-in
Unfriend - When someone unfriends you a numbered notification will appear above the unfriends tab it also provide the date and time you were unfriended.
Deactivations - It will also alert you when someone deactivated and reactivated his/her profile.
Friend requests - It will show your pending requests, and give you info on who ignored or cancelled your request.
Having any problem then leave your comment below.
Also Read :
Turn Chat Sign-in Off by Default on Facebook
Hello visitors, I'm once again with a new simple but interesting Facebook trick. It's true that we do spend lot of time on Facebook for chatting with our friends and relatives but sometimes we can't stand endless chat when we're browsing our status update, Today I'm sharing this another coot trick to turn off chat when you sing-in by default.


How to turn off chat by default on Facebook
Just follow these simple steps,
1. First off all login to your Facebook account.
2. Here you will find setting icon from the right button on Facebook, Image refer below,
3. If you wish to turn off chat for all friends simply click on "Turn off chat"
4. If you want more advanced option for turning off chat then click on "Advanced setting"
5. When box will pops-up you will see the options below,
6. Here you will see these three options
- First option is turn on chat for all friends except (In the box below, you can type the name of the people whom you don't want to chat)
- Second option is turn on chat for only some friends (In the box below, you can type the name of those some people whom you want to chat)
- And the third option is turn off chat for all friends.
I hope these trick help you to make the better your Facebook experience.
How to Add Footer Column Widget into Blogger blog

Adding a 3 Column Footer Widget
1. Navigate to template > edit HTML
2. Before making any edit always remember to backup your template
3. Find the following section in your Blogger template
2. Before making any edit always remember to backup your template
3. Find the following section in your Blogger template
<div id='footer-wrapper'>
<b:section class='footer' id='footer'/>
</div>
<b:section class='footer' id='footer'/>
</div>
If you are having difficulty finding this section trying searching for footer-wrap or something similar.
4. Replace all the code located in Step 3 with the following,
<div id='footer-columns'>
<div id='footer1' style='width: 30%; float: left; margin:0;
text-align: left;'>
<b:section class='footer-column' id='col1' preferred='yes'
style='float:left;'/>
</div>
<div id='footer2' style='width: 40%; float: left; margin:0;
text-align: left;'>
<b:section class='footer-column' id='col2' preferred='yes'
style='float:left;'/>
</div>
<div id='footer3' style='width: 30%; float: right; margin:0;
text-align: left;'>
<b:section class='footer-column' id='col3' preferred='yes'
style='float:right;'/>
</div>
<div style='clear:both;'/>
</div>
<div id='footer1' style='width: 30%; float: left; margin:0;
text-align: left;'>
<b:section class='footer-column' id='col1' preferred='yes'
style='float:left;'/>
</div>
<div id='footer2' style='width: 40%; float: left; margin:0;
text-align: left;'>
<b:section class='footer-column' id='col2' preferred='yes'
style='float:left;'/>
</div>
<div id='footer3' style='width: 30%; float: right; margin:0;
text-align: left;'>
<b:section class='footer-column' id='col3' preferred='yes'
style='float:right;'/>
</div>
<div style='clear:both;'/>
</div>
Adding a 4 Column Footer Widget
Replace all the code located in Step 3 with the following,
<div id='footer-columns'>
<div id='footer1' style='width: 25%; float: left; margin:0;
text-align: left;'>
<b:section class='footer-column' id='col1' preferred='yes'
style='float:left;'/>
</div>
<div id='footer2' style='width: 25%; float: left; margin:0;
text-align: left;'>
<b:section class='footer-column' id='col2' preferred='yes'
style='float:left;'/>
</div>
<div id='footer3' style='width: 25%; float: left; margin:0;
text-align: left;'>
<b:section class='footer-column' id='col3' preferred='yes'
style='float:left;'/>
</div>
<div id='footer4' style='width: 25%; float: right; margin:0;
text-align: left;'>
<b:section class='footer-column' id='col4' preferred='yes'
style='float:right;'/>
</div>
<div style='clear:both;'/>
</div>
<div id='footer1' style='width: 25%; float: left; margin:0;
text-align: left;'>
<b:section class='footer-column' id='col1' preferred='yes'
style='float:left;'/>
</div>
<div id='footer2' style='width: 25%; float: left; margin:0;
text-align: left;'>
<b:section class='footer-column' id='col2' preferred='yes'
style='float:left;'/>
</div>
<div id='footer3' style='width: 25%; float: left; margin:0;
text-align: left;'>
<b:section class='footer-column' id='col3' preferred='yes'
style='float:left;'/>
</div>
<div id='footer4' style='width: 25%; float: right; margin:0;
text-align: left;'>
<b:section class='footer-column' id='col4' preferred='yes'
style='float:right;'/>
</div>
<div style='clear:both;'/>
</div>
5. Save changes to your Blogger template
6. Navigate to Layout > Page Elements. You will now see a 3 column footer or a 4 column footer depending on what option you chose.


