Showing posts with label How to articles. Show all posts
Stop Your Image Stealing Using Jquery
Consider, you are working hard in creating images for your webpage and someone just copy and paste on their webpage without any credit or appreciation, then how would you like to feel? In today's post, here is a important trick for every blogger or webmaster to stop your Image stealing. You just have to put a little piece of code in your template which will prevent users to copy Images from your web page.

Note - If your blog have already a jquery plugin then ignore this step.
I hope this small trick will surely help you to prevent your Images from republishing on other websites.
How To Stop Your Image Stealing ?
- Go to Your Blogger Dashboard > Template > Edit HTML.
- Take a backup of your template.
- Now find for <head> in your template
- Add below code just above/before <head>
<script src='http://ajax.googleapis.com/ajax/libs/jquery/1.7.1/jquery.min.js' type='text/javascript'/>
Note - If your blog have already a jquery plugin then ignore this step.
- Now again find </head>
- And add below code just above/before </head>
<script type='text/javascript'>
//<![CDATA[
$(function(){
$(".post-body img").after("<img src="https://blogger.googleusercontent.com/img/b/R29vZ2xl/AVvXsEhSs99ysC5QivdXS4wMIdmGcPANfDKWGiDmPDLij4YG3mI4k-FerMG31yb6VjhTX1rLSTHFQ2MnRvMjzDvm8wXkwg3Ql2y7fIu8UEBfGgcnE4KUlVWVempW7qTSxAws6daIcHhI18fQqq6C/s1600/Stealing-Detected.png" alt="Things-Guide Stealing Detected" style="margin-left: -212px; opacity: 0; position: relative; top: 0;" />");
});
//]]>
</script>
//<![CDATA[
$(function(){
$(".post-body img").after("<img src="https://blogger.googleusercontent.com/img/b/R29vZ2xl/AVvXsEhSs99ysC5QivdXS4wMIdmGcPANfDKWGiDmPDLij4YG3mI4k-FerMG31yb6VjhTX1rLSTHFQ2MnRvMjzDvm8wXkwg3Ql2y7fIu8UEBfGgcnE4KUlVWVempW7qTSxAws6daIcHhI18fQqq6C/s1600/Stealing-Detected.png" alt="Things-Guide Stealing Detected" style="margin-left: -212px; opacity: 0; position: relative; top: 0;" />");
});
//]]>
</script>
I hope this small trick will surely help you to prevent your Images from republishing on other websites.
How to Embed PDF, DOC, XLS Files Into Blogger
Hello friends, Due to my exam i was unable to post a single post, So I'm really sorry for this. In today's post I will tell you how you can embed PDF, DOC, or XLS files into blogger blog. This post is also described How to show PDF, DOC or XLS files on blogger without using third party or services. Blogger is a free blogging platform by Google and there are some limits, you cannot upload pdf, doc, xls files directly. So before we used third party websites or hosting services to embed these files. But now you don't need to go to third party websites, you can embed your PDF, DOC or XLS files using Google Drive, Google drive is a free cloud storage service by Google. So, without wasting a time let's come to the tutorial.


How to Show PDF, DOC, XLS files on Blogger
- At first, Go to the drive.google.com and login with your existing account or create a new one.
- Now upload your PDF, DOC or XLS file, After upload completed click on the uploaded file link. It opens in new tab
- In the new tab click on share and change the properties of sharing 'Private' to 'Public' or 'Anyone with the link'.
- Now, go to File > Embed (this PDF file) in menu bar.
- Now, Embed code will pops-up just copy that code and paste it on Edit HTML mode in blogger post editor.
I hope this tutorial will surely help you. If you have any questions or problem let me know.
» Awesome Facebook Like Box with Hover Effect for Blogger
» Awesome Facebook Like Box with Hover Effect for Blogger
How to Monitor Who is Connected to Your Wi-Fi Network

First of all go to the NirSoft Wireless Network Watcher download page and proceed to download the.exe file

After downloading finished you will need to start launcher. Once the application starts, You can configure more advanced settings for the software by navigating the path Options > Advanced Options
You can also set the software to beep whenever it detects a new connection, using the path Options > Beep on new device
Hope you're enjoying tutorials, Waiting for your comments.
Tag :
How to articles
How To Monitor Hidden Internet Connections

Using Command Prompt
Type cmd into the run box from start menu and click on OK
Type the characters netstat –abf 5 > activity.txt and hit the enter key. Wait a few minutes for Windows to record the processes.

Type Ctrl + C on your keyboard to stop recording.
Type activity.txt and hit the enter button. Notepad will now open with the recorded internet connections.
Using Nirsoft CurrPorts
The Nirsoft CurrPorts app lists detailed information regarding background internet connections of a computer. Go to the Nirsoft CurrPorts website and download the currports.exe

through this tutorial you can also check for unknown processes of viruses and malware who often use ports and incoming and outbound internet connections.
How To Change Your IP Address

Staps:
1. Type "CMD" into the run box from start menu and hit OK

2. Type "ipconfig" into the command prompt (This will show you info about your IP address)
3. Type "ipconfig /release" and hit "Enter (This will remove your currnt IP)

4. Type "ipconfig /renew" and you will be presented with a new IP address
5. Type "exit" and leave the prompt.
If this does not answer of your question, please leave your comment.
Nokia Only 70 Settings allowed Problem

Finally got it resolved, Follow my steps:
- At first download and install Oxycube

- Connect your phone using bluetooth or data cable in pc suite mode and open Oxycube
- Now in oxycube go to phone memory "C' in which find a folder "Omadm"
- In that folder there are 70 folders naming 1 to 70
- Delete all of them and you are done
Tag :
How to articles
How To Speed Up Internet Connection

Step 1- Click run in your start menu, Type gpedit.msc into the box and press OK

Step 2- Navigate Local computer policy > Computer configuration > Administrative template > Network > QoS pocket scheduler then open Limit reservable bandwwidth
Step 3- Click enable and change the bandwidth limit to 0% instead of 20%, Image refer below

Step 3- Click on apply and then OK, this might need a restart to start working.
How To Disable Unwanted Startup Program

Here's how to disable unwanted start up programs:
Step 1- Click the start button and type msconfig into the search box and hit enter. (If you are using windows xp go to Run and type msconfig)

Step 2- You will get system configuration window select the startup tab
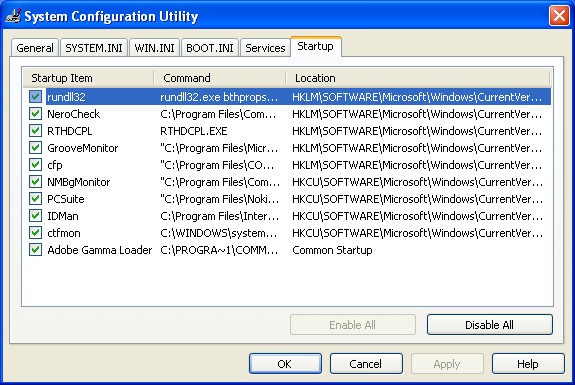
Step 3- Go to through the list disabling program you don't need and unticking the box left of them. The effects would take place next time you start your PC.
How To Repair Nokia Music player Problem

Q- What is Oxycube?
Oxycube allows you to work with your phone from your PC with this program you will be able to read and write phonebook, explore and edit your phone drives, see its problem and many more, OxyCube works well with Nokia phones and all Symbian-based smartphones. This includes 500+ models.
Now we can solve music player problem
First of all download and install Oxycube
Step 1- Connecy your phone using bluetooth or data cable in PC suite mode and open Oxycube
Step 2- Now in oxycube go to "C" in which you can see "hiddenfolder", refer below image


Step 3- In hidden folder find "music.db" or "mmc.db" now delete this file and disconnect your phone from PC

Now restart your phone and your Music player will be ready to use.
Tag :
How to articles
How To Use a USB Pendrive As RAM

In windows XP
Most of the people are using windows xp, This article is for them, Now let's read below explanation to use your pen drive as ram in windows xp.
First of all connect your pen drive to your PC (Pen drive should be at least 1 GB)
After your PC finished it's detection work you have to do some step-
Step 1- Right click on the my computer and click on properties
Step 2- Click on advanced tab and then click on performance
Step 3- Now click on advanced and then click on the virtual memory
Step 4- Select your flash drive and click custom size
Step 5- Now view the memory available in your flash drive and write it down then click on OK
Now you are done, Restart your PC and enjoy your fast system.
In windows Wista and windows 7
Windows wista and windows 7 comes with a ReadyBoost option. ReadyBoost is a disk cache component of microsoft, It works by using flash memory, a USB flash drive, SD card or any flash mass storage drive as a cache, Anyway leave that, now see how to use these feature.
Step 1- Insert your flash drive and format it with FAT32 or NTFS
Step 2- Right click on your external device volume and click on properties
Step 3- Now click on ready boost tab and then 'use this device'
Step 4- Choose maximum space to reserve system speed then click on OK and Apply
Now your ReadyBoost flash drive is ready to use.


